Membership setup
Welcome to a simplified member experience! New members will be able to sign up easily, make payments, and manage their own accounts – all of which can be done conveniently online at any time. Collecting dues online and managing membership are made easy, so you can spend more time on your mission.
Setting up membership is a two-part process:
Watch our video tutorial or follow the detailed steps below to get started.
Setting up membership is a two-part process:
- Set up your chapter’s membership levels
- Add and verify your bank account to collect dues
Watch our video tutorial or follow the detailed steps below to get started.
Create membership levels
Use membership levels to allow members to select from multiple membership options upon joining your group or renewing. You can offer free or paid memberships with the option to implement automatic recurring payments. This is ideal for annual dues, a monthly service, or any other recurring membership payment.
First, log in to your memberplanet admin portal at https://www.memberplanet.com/Login.aspx.
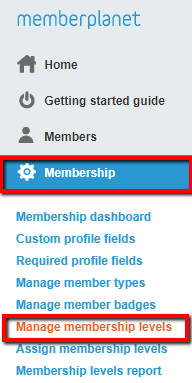
- Click Membership in the left navigation bar
- Select Manage Membership Levels in the submenu
3. Use the dropdown menu to select My Group has Membership Levels
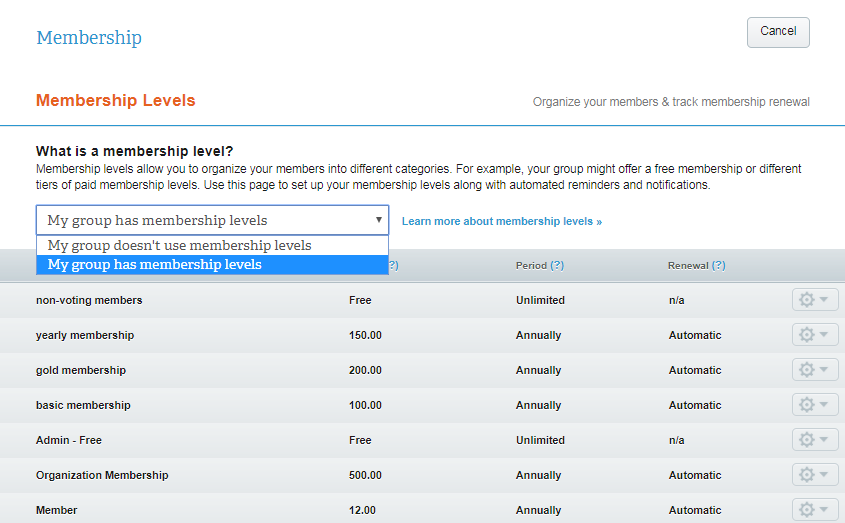
4. Click the Add a Membership Level button
5. Title your level (Example: "Platinum")
6. Use the adjacent dropdown menu to select if level is free or paid
5. Title your level (Example: "Platinum")
6. Use the adjacent dropdown menu to select if level is free or paid
- If you select Paid, additional dropdown menus will appear for you to select membership billing options.
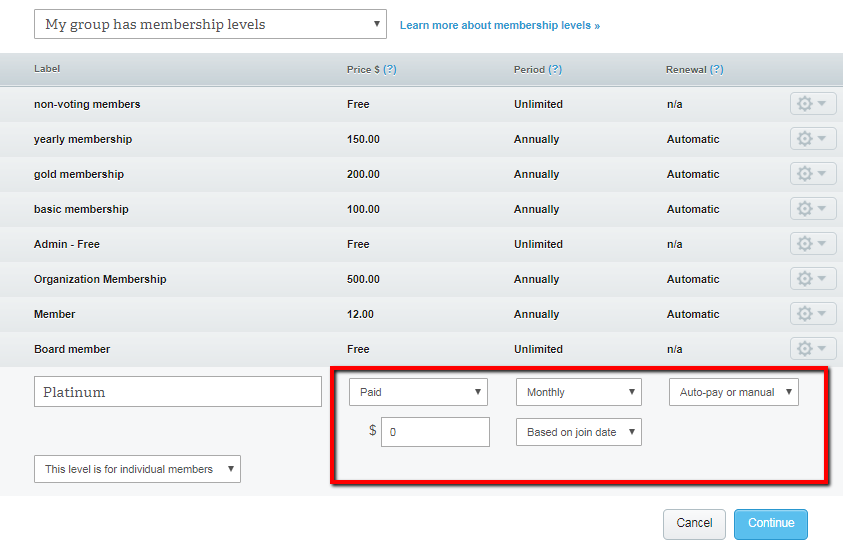
7. If paid, use the dropdown menu to select the interval of membership billing
Note: Select automatic to automatically re-enroll members each period. Select manual if members must opt in each period.
8. Set a price
10. Add a description for your level
Note: All notifications are set to the default No Actions Selected, except for the renewal confirmation, meaning that you must enable an action.
Note: Select automatic to automatically re-enroll members each period. Select manual if members must opt in each period.
8. Set a price
- If you decide to have your members, rather than your group, absorb the transaction fees, you will need to calculate the total fee and add it to the price of your membership level. Learn more: How to Calculate the Total Transaction Fee
10. Add a description for your level
- This is a good place to educate members about how this level differs from other options. Click add/edit to include a description or images.
Note: All notifications are set to the default No Actions Selected, except for the renewal confirmation, meaning that you must enable an action.

|
Pro Tip: Once you enable your notification emails, all members on the specified level receive them. It might take you a couple minutes to customize your notifications, but once you’ve done it, this set-and-forget feature will save you time in the long run. |
In your Late & Missed Renewal actions, you have the option to automatically change members’ type, change members’ level, and change member’s status to lapsed by clicking the applicable checkboxes. You can also choose to notify the member and chapter admins of these changes.
12. Click Save and Close when finished
- Repeat steps 4 - 12 to add another membership level.
Assigning existing members to a membership level / recording offline payments
After you’ve created your membership levels, you’ll need to assign your existing members to them. When you’re getting your chapter set up on memberplanet, you may have members who have already made their membership payments. You may also have those who prefer to make cash or check payments for their membership. You can record offline payments for your members and assign them to membership levels. As an admin, you are also able to omit offline payments when generating reports. This is helpful if you want to separate the two types of payments and keep online payment reports accurate.
After you’ve created your membership levels, you’ll need to assign your existing members to them. When you’re getting your chapter set up on memberplanet, you may have members who have already made their membership payments. You may also have those who prefer to make cash or check payments for their membership. You can record offline payments for your members and assign them to membership levels. As an admin, you are also able to omit offline payments when generating reports. This is helpful if you want to separate the two types of payments and keep online payment reports accurate.
To record an offline transaction while assigning a level (which will show in payment reports)
- Click Membership in the left navigation bar
- Select Assign Membership Levels in the submenu
- Select a membership level that the member(s) will be assigned to (your selection will automatically populate the amount)
- Choose a payment method
- Enter the payment date (MM/DD/YYYY) and the paid through date
- Add a memo (optional)
- At the bottom of the screen, choose the member(s) that will be assigned to this level that you want to record the offline payment for, or click All Members for it to be assigned to everyone

To assign a level (which will NOT show in your payment reports)
- Click Membership in the left navigation bar
- Select Assign Membership Levels
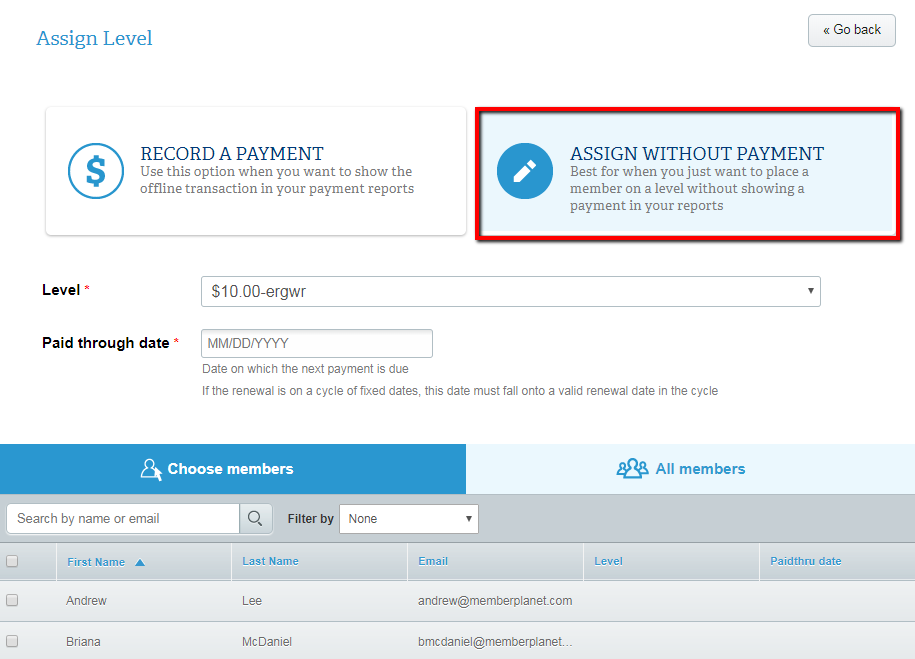
- Click on Assign Without Payment
- Select a membership level that the member(s) will be assigned to
- Enter the paid through date (MM/DD/YYYY)
- Choose the member(s) that will be assigned to the level you chose, or click All Members for it to be assigned to everyone
- After you’ve finished either recording your offline transaction, or assigning a level, click the Assign Level button at the bottom of the page
Adding and verifying a bank account
The second part to setting up membership is adding and verifying a bank account to collect dues. memberplanet is a convenient and secure platform to process online payments. We take security very seriously, which is why we require bank account verification for any banking deposits.
The second part to setting up membership is adding and verifying a bank account to collect dues. memberplanet is a convenient and secure platform to process online payments. We take security very seriously, which is why we require bank account verification for any banking deposits.
You will need to set up and verify your bank account in order to receive funds you’ve collected on memberplanet.
Complete the steps in the support documentation: How to Add and Verify Your Bank Account, which is broken up into two parts:
Complete the steps in the support documentation: How to Add and Verify Your Bank Account, which is broken up into two parts:
- Adding a bank account
- Identification document upload
Support |
|


© 2020 memberplanet, LLC. ALL RIGHTS RESERVED.